

How To Use A Drywall Banjo
How to Tape Drywall With a Banjo
Updated: Jun. 09, 2020
Speedy, trouble-free taping is easy with this pro tool
Fast, trouble-free drywall taping is like shooting fish in a barrel with this professional taper's tool. With a little practice you can learn to use a taping banjo and complete large drywall taping jobs in a bustle.
Y'all might also similar: TBD
- Time
- Complexity
- Cost
- A full mean solar day
- Intermediate
- $101–250
How to utilise a banjo
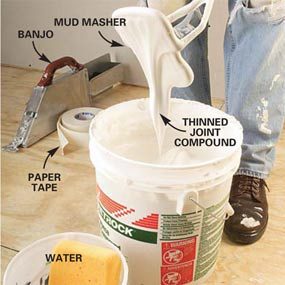
Photo one: Thin the mud
Mix the joint chemical compound to decide its consistency. And so mix in water until the articulation compound is thin enough to drip slowly from your mixer. Add together small amounts of water past squeezing it from a sponge.
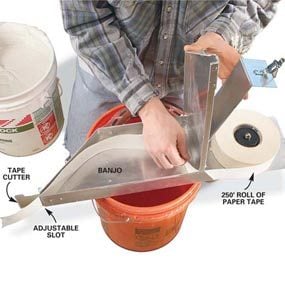
Photo 2: Load the paper tape
Thread newspaper drywall tape through the banjo as shown in the photo. Clamp the metal cover over the 250-ft. roll of tape to secure it.
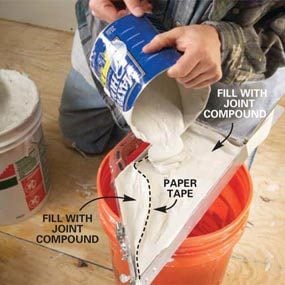
Photo 3: Load the banjo with mud
Cascade the thinned articulation compound into the banjo. Pull a section of tape away from the banjo wall and cascade joint compound into the infinite to assist encompass the topside of the tape with joint compound when you pull it from the banjo (see photograph). Completely fill up the compartment and clamp the lid shut. Tip the banjo down and pull the tape until articulation compound is visible on both the forepart and back sides. Cut this piece of tape loose and throw it away.
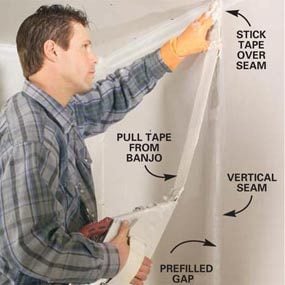
Photo iv: Apply the record
Take hold of the tape and pull out about 12 in. Starting at the top of a vertical seam, center the tape and stick it to the wall. Hold the tape in this position while you lot pull the banjo with the other arm to release more tape. Slide your hand down the tape to press information technology to the wall and repeat the process as you lot work the length of the seam.
Photograph 5: Cut the tape
Using a slight twist, snap the record with the blade at the nose of the banjo. If this doesn't work for you lot, grab the tape and pull information technology beyond the nose to tear it. Afterward the record is cut, quickly betoken the olfactory organ of the banjo toward the floor to prevent the tape from being pulled back into the banjo by the weight of the joint chemical compound.
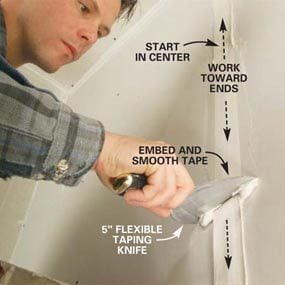
Photo 6: Embed the tape
Embed the tape and smooth it past dragging a 5- or 6-in. flexible taping knife over the tape. Apply just enough force per unit area to flatten the tape to the wall. Get-go at the middle and work in both directions to the ends.
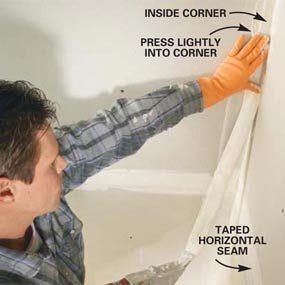
Photo 7: Record within corners
Eye the tape on inside corner seams and printing it lightly into place with your hand.
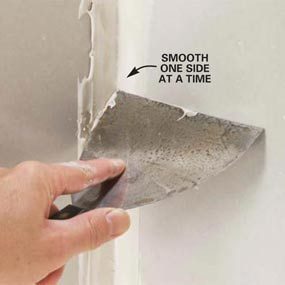
Photo 8: Smooth i side of a corner
Smooth one side and so the other with your flexible taping pocketknife. Run the side of the knife against the adjacent wall to guide it and create a directly, foursquare corner.
Taping drywall isn't for anybody. Information technology takes patience and a fair corporeality of skill to do a good job. But if you're like me and relish the claiming, here'southward a tool you've gotta try out. It's called a banjo and it makes short work of roofing drywall seams with newspaper tape. But speed isn't the only advantage a banjo offers. It practically eliminates the common problem of loose or bubbling record that plagues many beginning tapers.
In this article, nosotros'll show y'all how to use a banjo to use the first coat of paper tape to drywall seams. A banjo like the one we're using costs $75 to $100, a big investment for the occasional taping job. Fortunately, nigh full-service rental stores and some home centers hire banjos for nearly $ten per day— enough of time to get a coat of tape on ane or ii rooms.
Thinned mud is the cardinal to success
You'll observe ready-mixed joint compound (called "mud" in drywall taping lingo) in plastic buckets or boxes at home centers, lumberyards and drywall suppliers. Buy all-purpose lightweight joint compound (ane blazon is USG'south Plus-3) and use information technology for embedding the tape equally well as covering the tape with the second and third coats. You lot'll have to thin the mud with water, upwardly to about 4 cups per pail, before y'all pour it into the banjo. If yous're only taping 1 or two rooms, transfer a few gallons of joint chemical compound to another bucket. Then you'll yet be able to apply the remaining thicker mud for troweling on the second coat. Offset mix the articulation compound with either a potato masher– blazon mixer like we're using (Photograph i) or a mixing paddle and heavy-duty ane/2-in. electrical drill (mashers or paddles are bachelor for well-nigh $11 at home centers and drywall suppliers). Then mix in water a little at a time until the joint compound drips in large blobs from the mixer (Photo 1).
The true test of proper mud consistency is how well information technology works in the banjo. Too thick and you'll struggle to pull out the record. Too thin and the mud volition leak from every nook and cranny. When you become it right, the tape will pull out smoothly, be evenly coated and flatten easily with your taping knife (Photo 4).
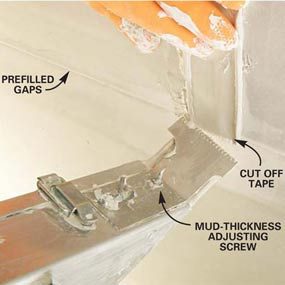
Conform the banjo to let out just enough mud
Load the banjo with paper tape and thinned joint compound (Photos 2 and three). And then with the nose of the banjo angled toward the floor, pull out a few feet of tape and inspect the back. A properly adapted banjo should exit an even ane/8-in. thick layer of articulation compound. On most banjos, the width of the slot where the tape comes out is adjustable by either turning a thumbscrew or loosening Wing-Nuts and sliding the tape cutter upward or downwards Test the setup by applying strips of tape to a scrap of drywall and flattening them with your taping knife. If very niggling articulation compound oozes out from nether the tape equally you embed information technology, widen the gap to deposit more than mud on the back of the tape. If there'southward so much articulation compound that information technology'due south difficult to embed the tape and a large corporeality of mud piles upwards nether your knife, reduce the size of the opening.
A layer of mud on the top and bottom of the tape ensures success
Photos 4 – 8 show how to apply the record to seams. To ensure problem-gratis results, prefill the gaps between sheets of drywall with a setting-blazon joint compound and allow it to harden. Be conscientious to wipe off all excess compound flush to the drywall equally you apply it, and scrape off whatsoever dried lumps with your taping knife before you start taping. Every bit you pull the tape from the banjo, the topside may exist dry or have very little joint compound. This isn't a trouble equally long as you trowel a sparse layer of joint compound over the tape before you embed information technology to lubricate your knife. If friction from your knife is leaving the record fuzzy or causing it to buckle upwards into little ridges, you'll know you demand to trowel on a thin layer of mud earlier yous trowel the tape apartment. Transfer the mud that oozes out from nether the record dorsum onto the surface of the record as y'all go.
As the mud in the banjo runs low, it will no longer cover the bottom of the tape and the tape will exist very like shooting fish in a barrel to pull out. These are clues to refill the banjo. Open up the cover and reposition the tape (Photograph 2) before you lot refill the compartment. Joint compound oft thickens as it sits. You lot may have to mix in a little more water.
Follow this sequence for the all-time results
The pros we talked to suggested applying tape in this order: (1) the vertical seams, (2) the horizontal seams and (3) the inside corners. It's OK to overlap the tape where one seam meets another. Divide long horizontal wall seams or seams that run beyond an entire ceiling into smaller sections by cutting the tape at an intersection with some other seam (it'southward difficult to embed a section much over x ft. long). E'er starting time at the heart of each department and work toward the ends when you're embedding the tape (Photograph six). It's OK to tape a number of seams earlier returning to embed the tape as long as the articulation compound doesn't start to dry out. Working with a partner who follows closely backside to embed the record is a good way to speed up the job.
Go on the tools clean to avoid lumps
Taping is a messy job. It's a expert idea to keep the banjo, mud pan and taping knife gratis of dried articulation chemical compound. I like to keep a v-gallon pail of warm water and a sponge handy to make clean my easily and wipe off the tools. Otherwise, piffling chunks of dried mud volition cause all kinds of problem as they get stuck nether the tape or in the joint compound. When you lot're through for the day, scrape excess mud into a garbage bag and scrub the banjo and tools with a stiff-bristle brush to remove joint compound before it hardens.
Required Tools for this Project
Have the necessary tools for this DIY project lined upwards before you outset—you'll save time and frustration.
Drywall taping banjo.
Required Materials for this Projection
Avoid final-minute shopping trips by having all your materials set ahead of time. Hither's a list.
Originally Published: June 20, 2017

How To Use A Drywall Banjo,
Source: https://www.familyhandyman.com/project/how-to-tape-drywall-with-a-banjo/
Posted by: sosaammed1971.blogspot.com
0 Response to "How To Use A Drywall Banjo"
Post a Comment